在电脑上,我们一般想要撤销之前的操作的话,是通过按下快捷键 Command + Z 来实现的。而在iOS中,其实有时候我们也需要在app中添加这样的Undo 功能,实现起来也没有很复杂。类似于 UITextField 和 UITextView 这样的类,已经实现了 Undo 功能。你只需要在app中的某个区域添加这个功能按钮。
Undo Manager
Undo功能是由一个NSUndoManager实例来提供的,这个实例管理了包含所有可撤销操作的栈,还有一个包含了可重复操作的栈。当用户选择撤销衣蛾操作时,位于Undo 栈的栈顶位置的操作将会弹出,恢复到之前的状态,然后把这个弹出的操作压入Redo栈的栈顶。
为了演示这个功能,下面的例子中,用户可以拖动一个小的矩形区域。MyView是UIView的子类,添加了一个UIPanGestureRecognizer 手势识别,让用户可以拖动:
- (void) dragging: (UIPanGestureRecognizer*) p {
    if (p.state == UIGestureRecognizerStateBegan ||
            p.state == UIGestureRecognizerStateChanged) {
        CGPoint delta = [p translationInView: self.superview];
    CGPoint c = self.center;
        c.x += delta.x; c.y += delta.y;
        self.center = c;
        [p setTranslation: CGPointZero inView: self.superview];
    }
}
为了让这个拖动可以撤销,我们需要一个NSUndoManager 实例。我们保存这个实例到MyView的undoer 属性里面。
有两种方式可以注册一个动作为可撤销的。
1、 一种是调用 NSUndoManager 的 registerUndoWithTarget:selector:object: 方法。稍后,只要NSUndoManager收到了undo 消息,它就是调用这个 target 指定的 selector 方法。
下面我们修改一下 dragging: 方法,不直接设置 self.center,而是调用一个下面的方法:
[self setCenterUndoably: [NSValue valueWithCGPoint:c]];
在这个方法里面,设置self.center属性:
- (void) setCenterUndoably: (NSValue*) newCenter {
    [self.undoer registerUndoWithTarget:self
        selector:@selector(setCenterUndoably:)
          object:[NSValue valueWithCGPoint:self.center]];
    self.center = [newCenter CGPointValue];
}
上面的做法不仅可以让我们操作可撤销,还可以让这个操作可重复。为什么,因为在NSUndoManager里面,有一条规则,就是如果当NSUndoManager正在撤销操作时,又收到registerUndoWithTarget:selector:object: 消息,那么就会把这个目标动作信息放在 Redo 栈中,而不是放在Undo 栈中。
目前为止,一切都还OK。但是我们每次在 dragging: 方法被调用时,都会添加一个单一的对象到Undo 栈中。而且这个dragging:方法是每次用户拖动都会被重复调用,这不是我们想要的。我们想要的是,每次撤销,都是撤销一个完整的拖动手势,而不是一点点的位置撤销。所以我们修改一下dragging: 方法,通过撤销组来实现:
- (void) dragging: (UIPanGestureRecognizer*) p {
    if (p.state == UIGestureRecognizerStateBegan)
        [self.undoer beginUndoGrouping];
    if (p.state == UIGestureRecognizerStateBegan ||
            p.state == UIGestureRecognizerStateChanged) {
        CGPoint delta = [p translationInView: self.superview];
        CGPoint c = self.center;
        c.x += delta.x; c.y += delta.y;
        [self setCenterUndoably: [NSValue valueWithCGPoint:c]];
        [p setTranslation: CGPointZero inView: self.superview];
    }
    if (p.state == UIGestureRecognizerStateEnded ||
            p.state == UIGestureRecognizerStateCancelled)
        [self.undoer endUndoGrouping];
}
接下来,我们让撤销操作执行动画:
- (void) setCenterUndoably: (NSValue*) newCenter {
    [self.undoer registerUndoWithTarget:self
        selector:@selector(setCenterUndoably:)
          object:[NSValue valueWithCGPoint:self.center]];
    if (self.undoer.isUndoing || self.undoer.isRedoing) { // animate
        UIViewAnimationOptions opt =
            UIViewAnimationOptionBeginFromCurrentState;
        [UIView animateWithDuration:0.4 delay:0.1 options:opt animations:^{
            self.center = [newCenter CGPointValue];
        } completion:nil];
    } else { // just do it
        self.center = [newCenter CGPointValue];
    }
}
2、 第二种方法是,调用prepareWithInvocationTarget:。
这种方式,可以传递任意类型的数据和任意数量的参数,我们把下面的代码:
[self.undoer registerUndoWithTarget:self selector:@selector(setCenterUndoably:)
                             object:[NSValue valueWithCGPoint:self.center]];
替换成:
[[self.undoer prepareWithInvocationTarget:self]
    setCenterUndoably: [NSValue valueWithCGPoint:self.center]];
内部是通过 NSInvocation来实现稍后发送信息给指定的目标。
那么,我们就不需要把CGPoint数据封装成NSNumber对象了,我们修改:
- (void) setCenterUndoably: (CGPoint) newCenter {
    [[self.undoer prepareWithInvocationTarget:self]
        setCenterUndoably: self.center];
    if (self.undoer.isUndoing || self.undoer.isRedoing) { // animate
        UIViewAnimationOptions opt =
            UIViewAnimationOptionBeginFromCurrentState;
        [UIView animateWithDuration:0.4 delay:0.1 options:opt animations:^{
            self.center = newCenter;
        } completion:nil];
    } else { // just do it
        self.center = newCenter;
    }
}
- (void) dragging: (UIPanGestureRecognizer*) p {
    [self becomeFirstResponder];
    if (p.state == UIGestureRecognizerStateBegan)
        [self.undoer beginUndoGrouping];
    if (p.state == UIGestureRecognizerStateBegan ||
            p.state == UIGestureRecognizerStateChanged) {
        CGPoint delta = [p translationInView: self.superview];
        CGPoint c = self.center;
        c.x += delta.x; c.y += delta.y;
        [self setCenterUndoably: c];
        [p setTranslation: CGPointZero inView: self.superview];
    }
    if (p.state == UIGestureRecognizerStateEnded ||
            p.state == UIGestureRecognizerStateCancelled)
        [self.undoer endUndoGrouping];
}
Undo 界面
默认情况下,你的应用支持 shake-to-edit。意味着,当用户摇动设备时,会调出 undo/redo 界面。如果你没有明确设置UIApplication 的 applicationSupportsShakeToEdit 属性为NO,那么当用户摇动设备时,应用会沿着响应者链,第一响应者开始,查找该响应者是否继承了 undoManager 属性,返回一个实际的 NSUndoManager实例。如果找到一个,应用会调出undo/redo 界面,允许用户与NSUndoManager交互。
下面让我们视图可以成为第一响应者,然后在用户拖动结束或者取消时,让该视图成为第一响应者:
- (BOOL) canBecomeFirstResponder {
    return YES;
}
- (void) dragging: (UIPanGestureRecognizer*) p {
    // ... the rest as before ...
    if (p.state == UIGestureRecognizerStateEnded ||
            p.state == UIGestureRecognizerStateCancelled) {
        [self.undoer endUndoGrouping];
        [self becomeFirstResponder];
    }
}
然后,让shake-to-edit 工作:
- (NSUndoManager*) undoManager {
    return self.undoer;
}
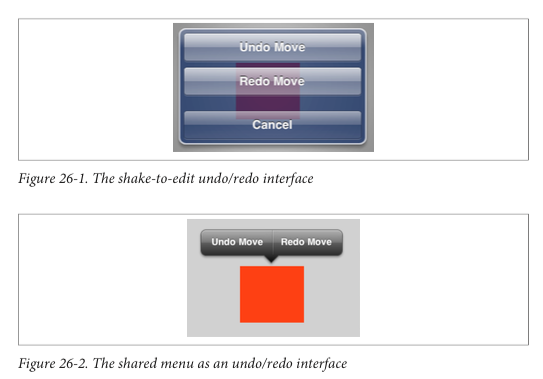
为了让弹出视图的button功能更加清晰,我们可以添加一个动作名称,用来显示在界面上:
[[self.undoer prepareWithInvocationTarget:self]
    setCenterUndoably: self.center];
[self.undoer setActionName: @"Move"];
// ... and so on ...
最终的效果如下图:

我们还可以使用长按弹出菜单:
- (void) longPress: (UIGestureRecognizer*) g {
    if (g.state == UIGestureRecognizerStateBegan) {
        UIMenuController *m = [UIMenuController sharedMenuController];
        [m setTargetRect:self.bounds inView:self];
        UIMenuItem *mi1 =
            [[UIMenuItem alloc] initWithTitle:[self.undoer undoMenuItemTitle]
                                       action:@selector(undo:)];
        UIMenuItem *mi2 =
            [[UIMenuItem alloc] initWithTitle:[self.undoer redoMenuItemTitle]
                                       action:@selector(redo:)];
        [m setMenuItems:@[mi1, mi2]];
        [m setMenuVisible:YES animated:YES];
    }
}
- (BOOL)canPerformAction:(SEL)action withSender:(id)sender {
    if (action == @selector(undo:))
        return [self.undoer canUndo];
    if (action == @selector(redo:))
        return [self.undoer canRedo];
    return [super canPerformAction:action withSender:sender];
}
- (void) undo: (id) dummy {
    [self.undoer undo];
}
- (void) redo: (id) dummy {
    [self.undoer redo];
}