UIActivityIndicatorView
self.activity.color = [UIColor yellowColor];
self.activity.backgroundColor = [UIColor colorWithWhite:0.2 alpha:0.4];
self.activity.layer.cornerRadius = 10;
CGRect f = self.activity.bounds;
f.size.width += 10;
f.size.height += 10;
self.activity.bounds = f;

UIProgressView
在 iOS6 一下,一个UIProgressView 类似于下面,高度是根据progressview的类型来自动设置的(标准是9),即使我们设置了也没有效果。

我们可以自定义UIProgressView的外观,为了自定义颜色,可以设置 progressTintColor,trackTintColor;为了自定义图片,可以设置progressImage,trackImage,这个图片会被拉伸来填充合适的范围,所以一般是提供一个高度为9的可拉伸的图片:
UIGraphicsBeginImageContextWithOptions(CGSizeMake(9,9), NO, 0);
CGContextRef con = UIGraphicsGetCurrentContext();
CGContextSetFillColorWithColor(con, [UIColor blackColor].CGColor);
CGContextMoveToPoint(con, 0, 4.5);
CGContextAddLineToPoint(con, 4.5, 9);
CGContextAddLineToPoint(con, 9, 4.5);
CGContextAddLineToPoint(con, 4.5, 0);
CGContextClosePath(con);
CGPathRef p = CGContextCopyPath(con);
CGContextFillPath(con);
UIImage* im = UIGraphicsGetImageFromCurrentImageContext();
CGContextSetFillColorWithColor(con, [UIColor whiteColor].CGColor);
CGContextAddPath(con, p);
CGContextFillPath(con);
UIImage* im2 = UIGraphicsGetImageFromCurrentImageContext();
CGPathRelease(p);
UIGraphicsEndImageContext();
im = [im resizableImageWithCapInsets:UIEdgeInsetsMake(4, 4, 4, 4)
                        resizingMode:UIImageResizingModeStretch];
im2 = [im2 resizableImageWithCapInsets:UIEdgeInsetsMake(4, 4, 4, 4)
                          resizingMode:UIImageResizingModeStretch];
prog.trackImage = im;
prog.progressImage = im2;
为了进一步的自定义,我们可以:
- (void)drawRect:(CGRect)rect {
    CGContextRef c = UIGraphicsGetCurrentContext();
    [[UIColor whiteColor] set];
    CGFloat ins = 2.0;
    CGRect r = CGRectInset(self.bounds, ins, ins);
    CGFloat radius = r.size.height / 2.0;
    CGMutablePathRef path = CGPathCreateMutable();
    CGPathMoveToPoint(path, nil, CGRectGetMaxX(r)-radius, ins);
    CGPathAddArc(path, nil,
        radius+ins, radius+ins, radius, -M_PI/2.0, M_PI/2.0, true);
    CGPathAddArc(path, nil,
        CGRectGetMaxX(r)-radius, radius+ins, radius,
        M_PI/2.0, -M_PI/2.0, true);
    CGPathCloseSubpath(path);
    CGContextAddPath(c, path);
    CGContextSetLineWidth(c, 2);
    CGContextStrokePath(c);
    CGContextAddPath(c, path);
    CGContextClip(c);
    CGContextFillRect(c, CGRectMake(
        r.origin.x, r.origin.y, r.size.width * self.value, r.size.height));
}
效果如下图:

UISwitch
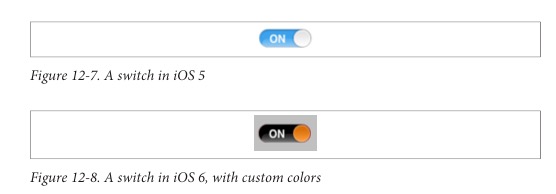
一个 switch只有一种尺寸(通常是79x27),我们不能设置它的大小。从iOS 5开始,我们可以设置一个switch的onTintColor,从iOS 6开始,我们可以设置一个switch的tintColor和thumbTintColor。

iOS 6 开始,也允许你设置一个switch的onImage和 offImage,意味着你可以改变这个switch里面的文字:
UIGraphicsBeginImageContextWithOptions(CGSizeMake(79,27), NO, 0);
[[UIColor blackColor] setFill];
UIBezierPath* p = [UIBezierPath bezierPathWithRect:CGRectMake(0,0,79,27)];
[p fill];
NSMutableParagraphStyle* para = [NSMutableParagraphStyle new];
para.alignment = NSTextAlignmentCenter;
NSAttributedString* att =
    [[NSAttributedString alloc] initWithString:@"YES" attributes:
        @{
            NSFontAttributeName:[UIFont fontWithName:@"GillSans-Bold" size:16],
            NSForegroundColorAttributeName:[UIColor whiteColor],
            NSParagraphStyleAttributeName:para
        }];
[att drawInRect:CGRectMake(0,5,79,22)];
UIImage* im = UIGraphicsGetImageFromCurrentImageContext();
UIGraphicsEndImageContext();
self.sw2.onImage = im;
效果如下图:

UISegmentedControl
我们可以自定义UISegmentedControl的分割图片和每个选项的图片:
// background, set desired height but make width resizable
// sufficient to set for Normal only
UIImage* image = [UIImage imageNamed: @"linen.png"];
CGFloat w = 100;
CGFloat h = 60;
UIGraphicsBeginImageContextWithOptions(CGSizeMake(w,h), NO, 0);
[image drawInRect:CGRectMake(0,0,w,h)];
UIImage* image2 = UIGraphicsGetImageFromCurrentImageContext();
UIGraphicsEndImageContext();
UIImage* image3 =
    [image2 resizableImageWithCapInsets:UIEdgeInsetsMake(0,10,0,10)
                           resizingMode:UIImageResizingModeStretch];
[self.seg setBackgroundImage:image3 forState:UIControlStateNormal
                  barMetrics:UIBarMetricsDefault];
// segment images, redraw at final size
NSArray* pep = @[@"manny.jpg", @"moe.jpg", @"jack.jpg"];
for (int i = 0; i < 3; i++) {
    UIImage* image = [UIImage imageNamed: pep[i]];
    UIGraphicsBeginImageContextWithOptions(CGSizeMake(30,30), NO, 0);
    [image drawInRect:CGRectMake(0,0,30,30)];
    UIImage* image2 = UIGraphicsGetImageFromCurrentImageContext();
    UIGraphicsEndImageContext();
    [self.seg setImage:image2 forSegmentAtIndex:i];
}
// divider, set at desired width, sufficient to set for Normal only
UIGraphicsBeginImageContextWithOptions(CGSizeMake(1,10), NO, 0);
[[UIColor whiteColor] set];
CGContextFillRect(UIGraphicsGetCurrentContext(), CGRectMake(0,0,1,10));
UIImage* div = UIGraphicsGetImageFromCurrentImageContext();
UIGraphicsEndImageContext();
[self.seg setDividerImage:div
      forLeftSegmentState:UIControlStateNormal
        rightSegmentState:UIControlStateNormal
               barMetrics:UIBarMetricsDefault];

Custom Controls
一个UIControl 类实现了一些触摸追踪的方法,你可以在子类中重写这些方法来实现自定义控件:
-
beginTrackingWithTouch:withEvent:
-
continueTrackingWithTouch:withEvent:
-
endTrackingWithTouch:withEvent:
-
cancelTrackingWithEvent:
-
tracking (property)
-
touchInside (property)
这些触摸追踪方法虽然不是手势识别的更高层次封装,但至少比UIResponse 的touches…方法高一级。
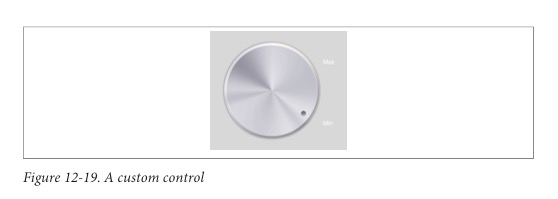
下面我们创建一个自定义的控件,一个UIControl的子类 MyKnob:

它有一个最小和最大的旋转角度,还有一个CGFloat类型的angle属性和一个CGFloat类型的实例变量 _initialAngle,我们会在旋转时用到。因为一个UIControl是一个UIView,它可以绘制自身,我们可以绘制一张图片:
- (void) drawRect:(CGRect)rect {
    UIImage* knob = [UIImage imageNamed:@"knob.png"];
    [knob drawInRect:rect];
}
我们需要一个实用的函数,用于将触摸的直角坐标转到极坐标,提供一个需要旋转的角度给我们的视图:
static CGFloat pToA (UITouch* touch, UIView* self) {
    CGPoint loc = [touch locationInView: self];
    CGPoint c = CGPointMake(CGRectGetMidX(self.bounds),
                            CGRectGetMidY(self.bounds));
    return atan2(loc.y - c.y, loc.x - c.x);
}
现在我们可以准备重写追踪方法:
- (BOOL) beginTrackingWithTouch:(UITouch*)touch withEvent:(UIEvent*)event {
    self->_initialAngle = pToA(touch, self);
    return YES;
}
- (BOOL) continueTrackingWithTouch:(UITouch*)touch withEvent:(UIEvent*)event {
    CGFloat ang = pToA(touch, self);
    ang -= self->_initialAngle;
    CGFloat absoluteAngle = self->_angle + ang;
    if (absoluteAngle < 0) {
        self.transform = CGAffineTransformIdentity;
        self->_angle = 0;
        [self sendActionsForControlEvents:UIControlEventValueChanged];
        return NO;
    }
    if (absoluteAngle > 5) {
        self.transform = CGAffineTransformMakeRotation(5);
        self->_angle = 5;
        [self sendActionsForControlEvents:UIControlEventValueChanged];
        return NO;
    }
    self.transform = CGAffineTransformRotate(self.transform, ang);
    self->_angle = absoluteAngle;
    if (self->continuous)
        [self sendActionsForControlEvents:UIControlEventValueChanged];
    return YES;
}
- (void) endTrackingWithTouch:(UITouch *)touch withEvent:(UIEvent *)event {
    [self sendActionsForControlEvents:UIControlEventValueChanged];
}

- (void) setAngle: (CGFloat) ang {
    if (ang < 0)
        ang = 0;
    if (ang > 5)
        ang = 5;
    self.transform = CGAffineTransformMakeRotation(ang);
    self->_angle = ang;
}
Appearance Proxy
外观代理给了我们一种设置控件全局样式的很方便的方式。这个代理有两个类方法:
appearance
appearanceWhenContainedIn:
设置一种例外
[[UIBarButtonItem appearance] setTintColor: [UIColor myGolden]];
表示通常情况下,一个 bar button item 应该是myGolden颜色
[[UIBarButtonItem appearanceWhenContainedIn: [UIToolbar class], nil]
                               setTintColor: [UIColor myPaler]];
表示bar button item 在 一个toolbar上时,应该是myPaler颜色,其它的按照上面的规定。
[[UIBarButtonItem appearanceWhenContainedIn:
    [UIToolbar class], [DrillViewController class], nil]
        setTintColor: [UIColor myGolden]];
表示bar button item 在一个toolbar上,同时有属于DrillViewController的视图时,应该是myGolden颜色,其它的按照上面的规定。
这个外观代理是一个id类型,所以你可以发送任何响应的消息,但是如果你发送给一个没有定义为UI_APPEARANCE_SELECTOR的消息给一个类,编译时不会报错,但是运行时会崩溃。所以,我们一般的写法不是:
[[UIBarButtonItem appearance] setTintColor: [UIColor brownColor]]; // 不严谨
而是:
((UIBarButtonItem*)[UIBarButtonItem appearance]).tintColor =
    [UIColor brownColor];  // 推荐